Documentation
user guide
CourseCraft User Guide
This guide assumes you've never seen CourseCraft before. By the end, you'll know how to navigate courses, take quizzes, listen to AI-generated audio, track your progress, edit content, and build a course from scratch. Everything is explained in plain English.
Setting Up
Open a terminal, navigate to the project folder, and run two commands:
npm install
./dev-all.sh
The terminal will show you where things are running. The frontend URL is what you open in your browser — usually something like http://localhost:5173. If that port is busy, Vite automatically picks the next one and tells you.
The backend and frontend are separate processes that the startup script runs together. If something goes wrong, Ctrl+C in the terminal and run ./dev-all.sh again. It's a clean restart every time.
The Course Selection Screen
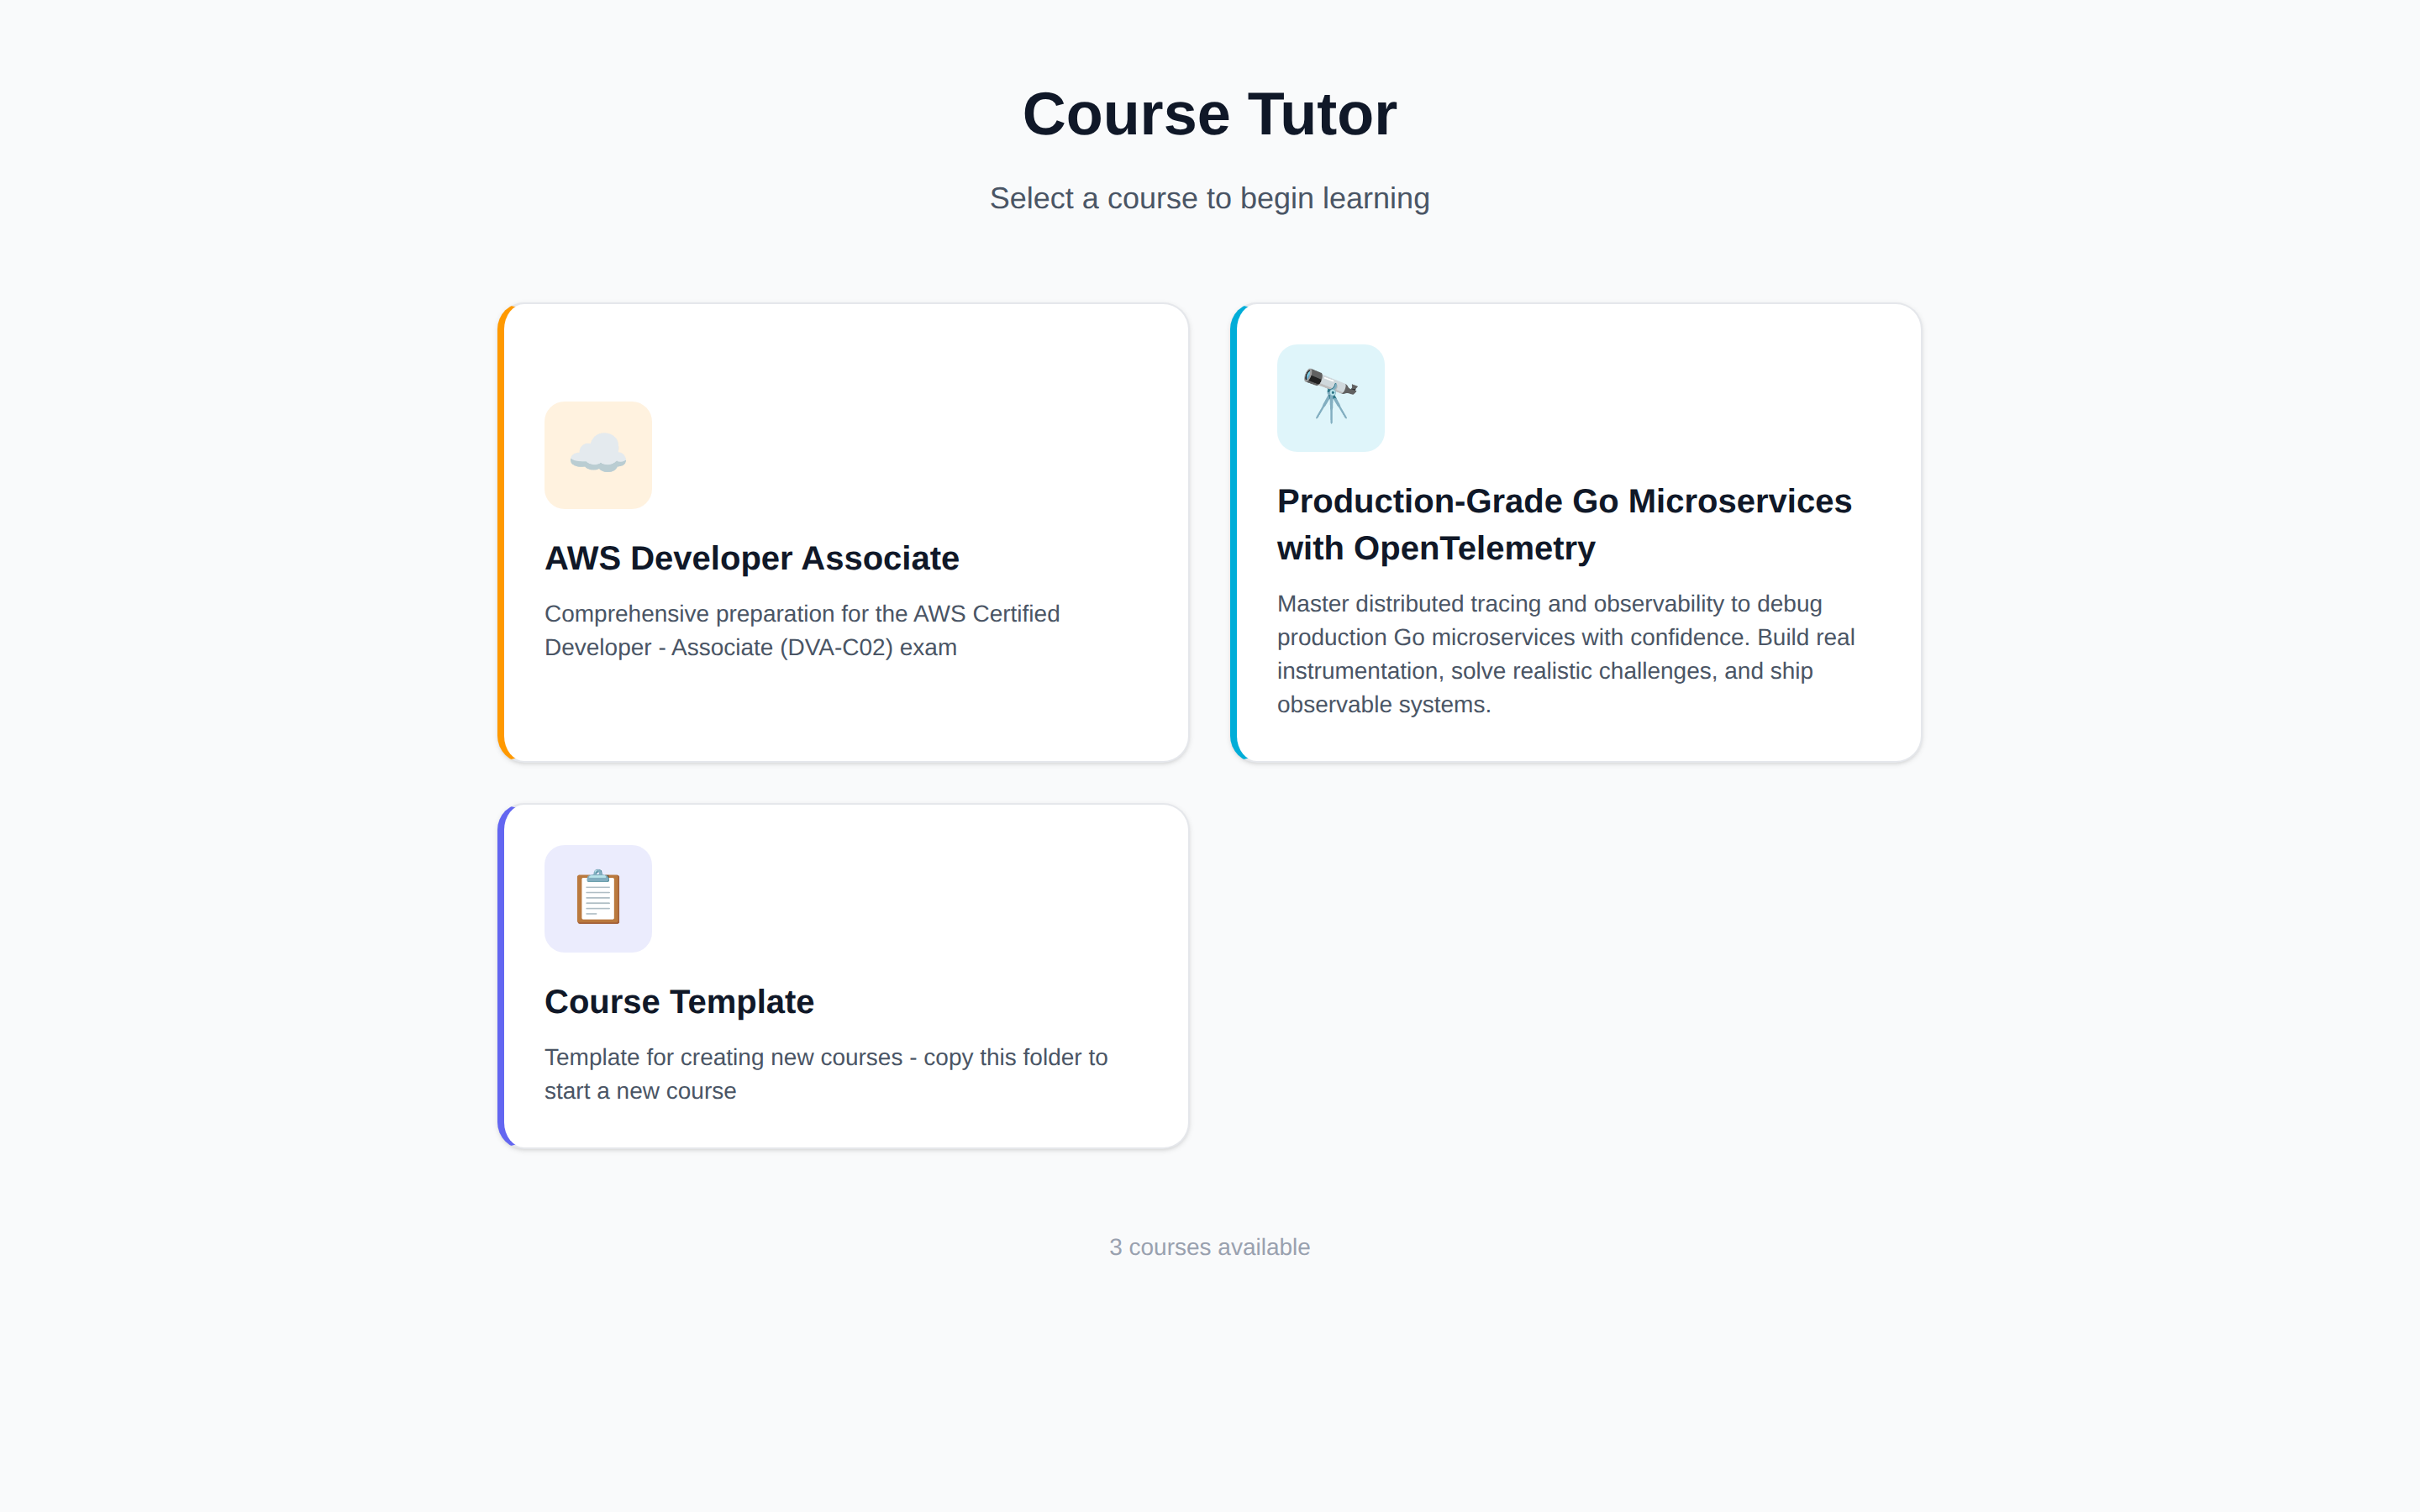
When you first open CourseCraft, you're looking at the Course Home — a grid of cards, one per course. Each card shows the course emoji, title, description, and a colored accent. Click any card to enter that course.
If only one course exists in the system, CourseCraft skips this screen entirely and drops you straight into it. This is by design — during development you don't want to click through a selection screen every time you refresh.
Inside a Course
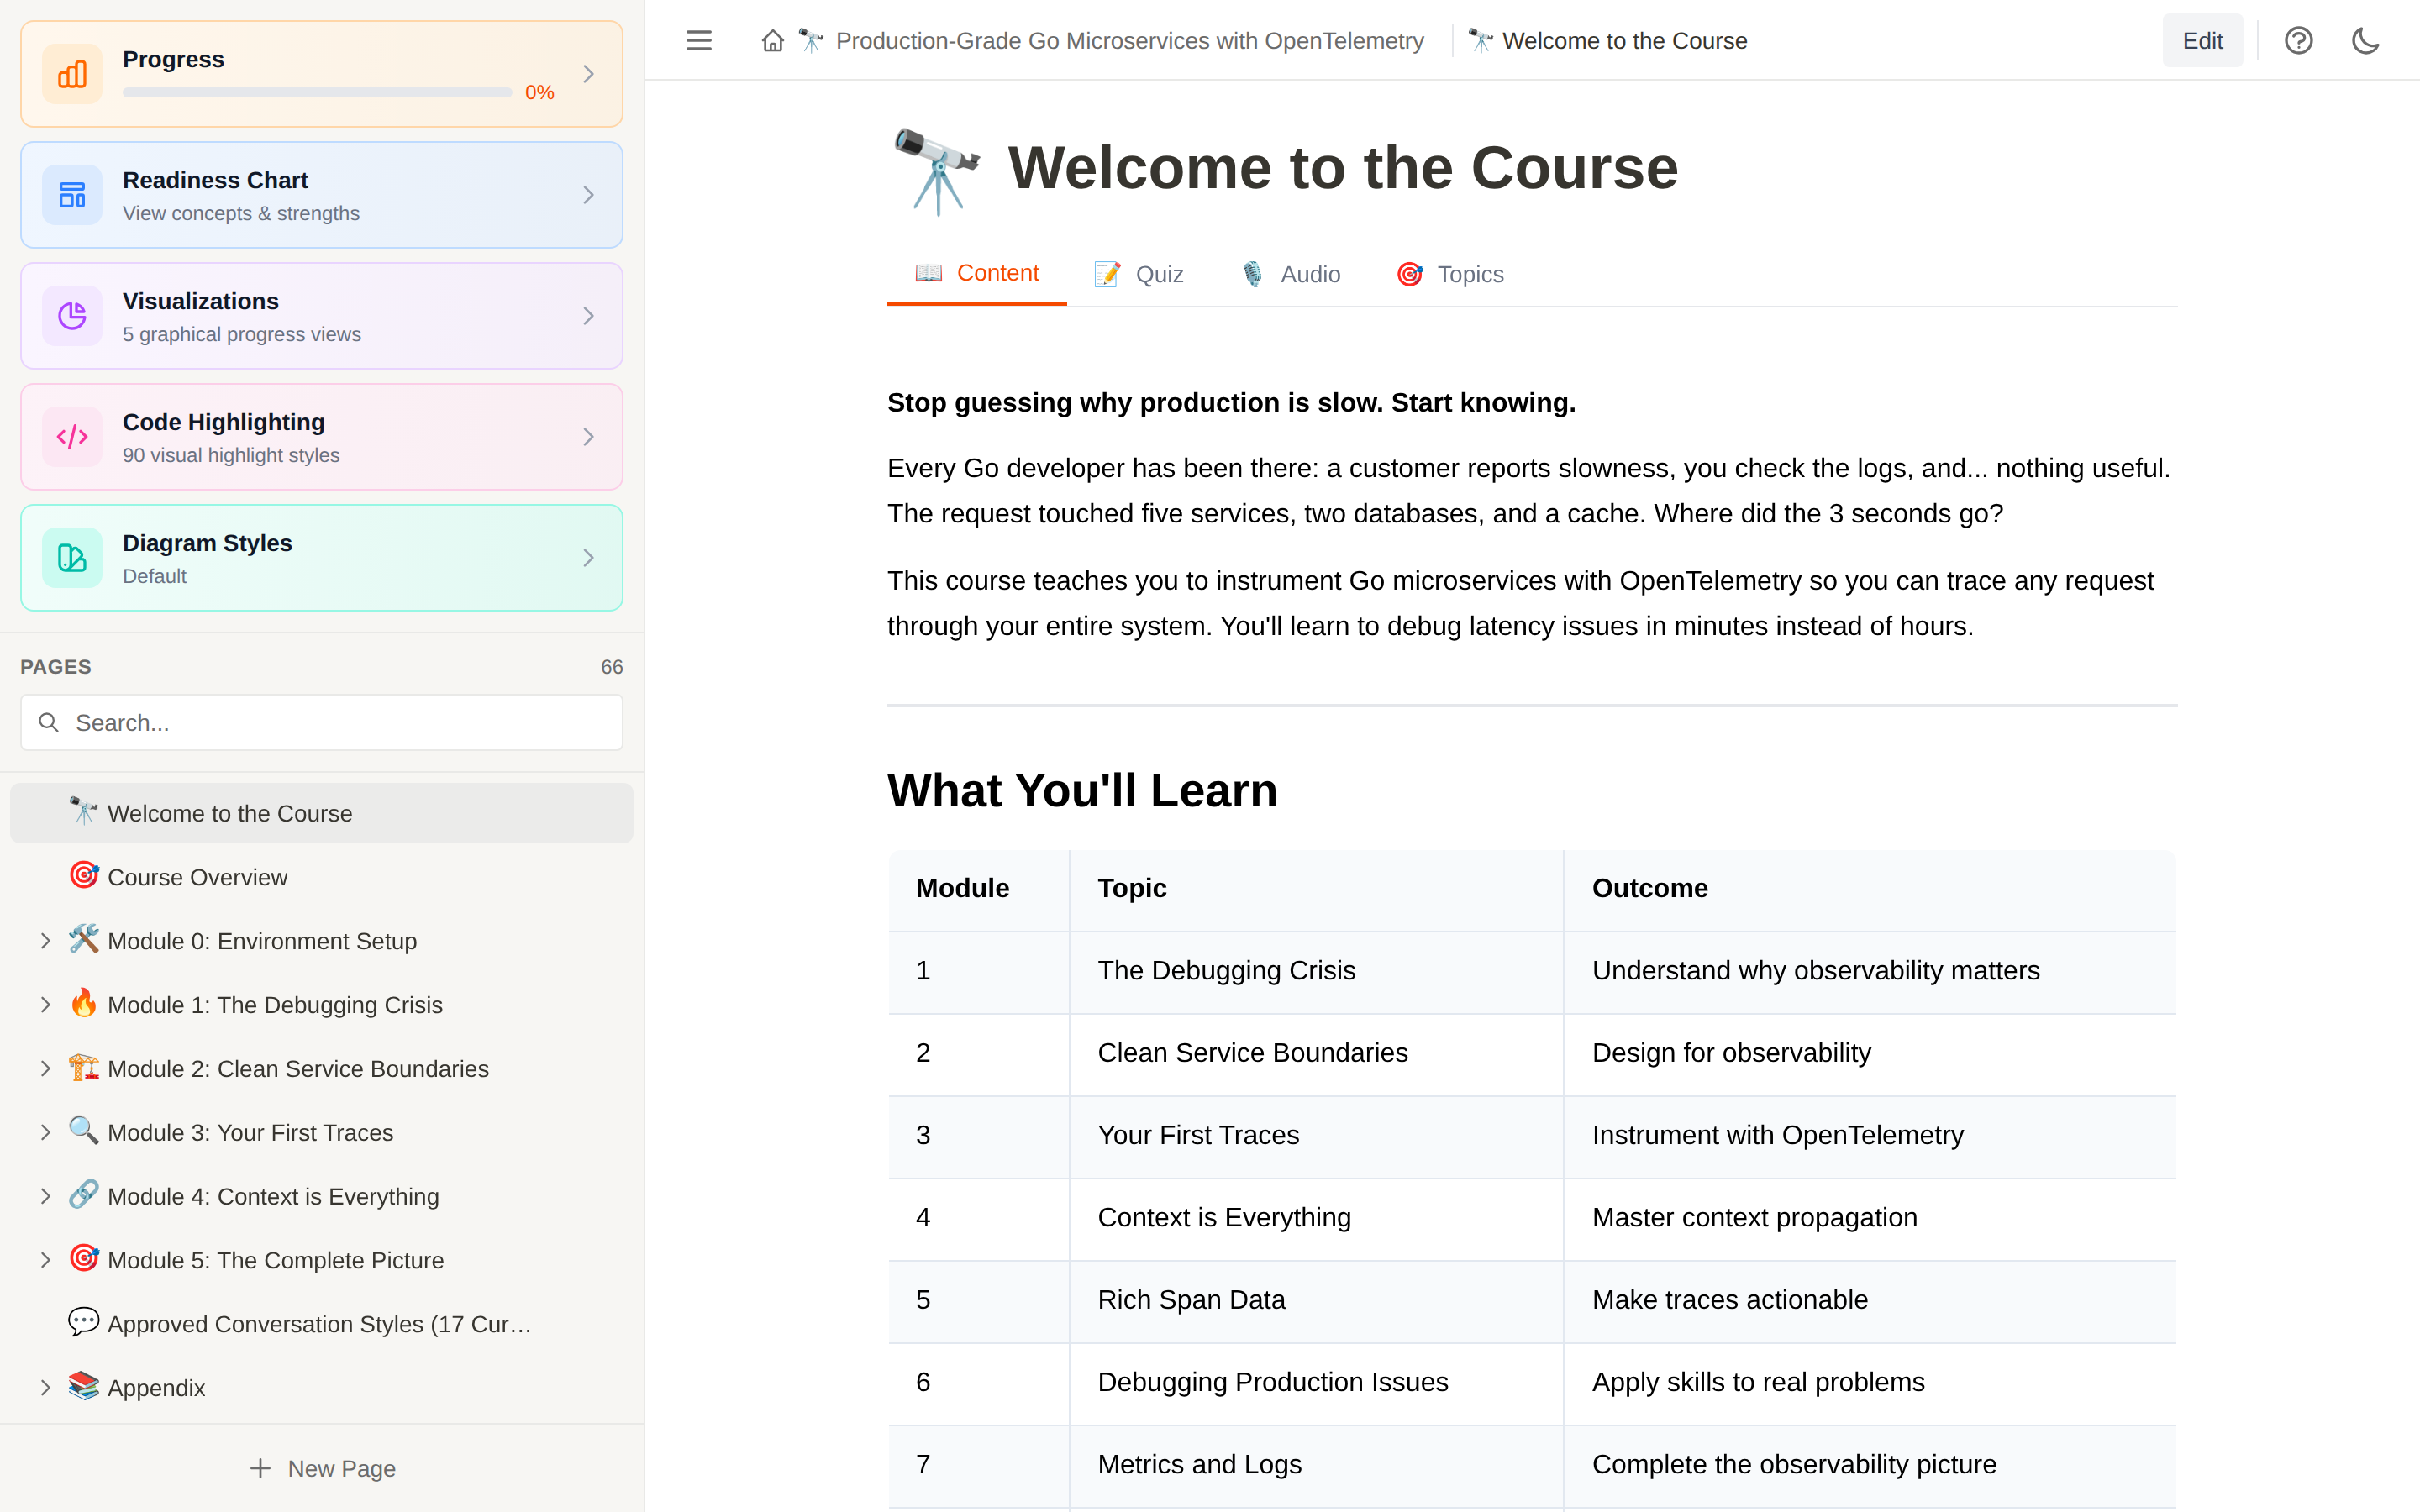
Once you've selected a course, the screen splits into two areas.
The Sidebar
On the left is your navigation. At the top, you'll see buttons for Progress (the dashboard), Readiness Chart, Visualizations, Code Highlighting style selection, and Diagram Styles.
Progress shows a per-chapter breakdown of how you're doing — overall completion, which sections you've read, which quizzes you've passed. Think of it as the course's control panel.
Readiness Chart shows how prepared you are based on quiz scores. Chapters glow green when you've mastered them (80%+), yellow when you've attempted but haven't passed, and stay gray until you try. It's the fastest way to see where your gaps are.
Visualizations is where CourseCraft gets creative. Instead of a single progress bar, you get ten completely different ways to see how you're doing. More on this in its own section below — it's worth exploring.
Below those buttons is the page tree. This is every page in the course shown as a hierarchy. Top-level pages sit at the root, and pages with children have a disclosure triangle. Click any page to load it. The currently selected page is highlighted so you always know where you are.
You can resize the sidebar by dragging its right edge. Your preferred width is remembered across sessions.
The Content Area
The right side of the screen shows the page itself. At the top is a breadcrumb trail showing where you are in the course hierarchy, followed by the page title and emoji. To the right you'll find controls for edit mode and dark mode.
Below the header, you'll see tabs. The Content tab is selected by default. Other tabs appear depending on what's available for the page — Quiz, Audio, and Topics.
Reading Through Course Material
This is what most people will spend their time doing. Here's what you'll encounter.
Navigation
Click pages in the sidebar, or use the Previous/Next arrows at the bottom of each page to move through the course sequentially. The URL updates as you navigate — every page has a unique address like /page/tracing-database-calls — so you can bookmark specific pages or share links directly.
CourseCraft remembers where you left off. Close the browser, come back a week later, and it loads the exact page you were reading at the same scroll position. Nothing is lost.
Code Blocks
Technical courses live and die by their code presentation, and CourseCraft takes this seriously. Code blocks render with proper syntax highlighting for Go, TypeScript, JavaScript, Python, Bash, SQL, YAML, JSON, and more. The language is labeled in the corner. Colors are carefully chosen so keywords, strings, comments, and types are immediately distinguishable.
This isn't a generic highlighter slapped on a <pre> tag. It uses the same highlighting engine (lowlight/Prism) that powers editors like VS Code, so the coloring matches what developers actually see in their tools.
Callout Boxes
These are colored blocks that interrupt the flow to call attention to something important. You can see one in the screenshot above — the orange "Learning Approach" callout. There are four types, each with a distinct colour so your eye catches them immediately:
Info callouts (blue) provide background context. Think "this is useful to know but you won't break anything if you skip it."
Tip callouts (green) offer practical advice. Things you can use right now.
Warning callouts (yellow) flag common mistakes. "Don't do this" or "watch out for this gotcha."
Critical callouts (red) mark things that will cause real problems if ignored. Production will break, data will be lost, that kind of thing.
Terminal Blocks
Also visible in the screenshot above — simulated terminal output with a dark background, traffic-light window controls at the top, and syntax coloring for commands, output, and error messages. These show what running a command actually looks like, which is far more useful than just describing it in text.
Mermaid Diagrams
Flowcharts, sequence diagrams, class diagrams, entity-relationship diagrams — rendered live in the browser from text-based diagram code. The magic is in the styling. CourseCraft has over 90 visual highlight styles that use SVG displacement filters to make diagrams look hand-drawn.
You might see a diagram that looks sketched on a whiteboard with dry-erase markers. Or one that looks like a blueprint on blue paper. Or a chalkboard illustration, a watercolor painting, a cyberpunk neon schematic, or a pencil doodle on notebook paper. Each style uses actual pixel-level distortion to add organic wobble to lines, not just color changes.
The Code Highlighting selector lives in the sidebar. Changing it affects all diagrams in the course simultaneously. There's also a separate Diagram Styles selector for the Mermaid theme itself.
Trace Waterfall
If you're taking the OpenTelemetry course, you'll see interactive distributed trace visualizations embedded in the content. These show a request flowing through multiple services — order service, payment service, inventory service, database — as a timeline with colored bars showing how long each operation took.
Hover over a span to see its details. The visualization is the same kind of thing you'd see in Jaeger or Zipkin, but it's right there in the lesson where you need it, not in a separate tool.
In-Page Learning Checks
Scattered throughout pages, you'll find small interactive exercises that test your understanding without making you leave the page or open a quiz:
Inline quizzes are quick multiple-choice questions embedded in the flow of the text. They appear right after the concept they test, so the material is fresh.
Reflection prompts ask open-ended questions. There's no right answer — they're designed to make you stop reading on autopilot and actually think about what you just learned. Good reflection prompts feel slightly uncomfortable because they force you to confront whether you really understood something.
Code completion presents a code block with blanks where key parts are missing. You type in what goes there. The system accepts multiple valid answers for each blank, so you aren't penalized for using err instead of error or ctx instead of context.
Dark Mode
Click the moon icon in the top-right corner to switch to dark mode. Every component — diagrams, code blocks, callouts, the sidebar, terminal blocks, everything — adapts. The dark theme uses a deep navy background with carefully tuned contrast ratios so text stays readable and code highlighting still pops.
Click the sun icon to switch back. Your preference persists across sessions.
Taking Quizzes
Click the Quiz tab when you're on a page that has one. You'll see questions one at a time with a navigation strip showing which questions you've answered.
The Question Types
Multiple Choice is straightforward — one correct answer among several options.
Multiple Select is trickier. Several answers can be correct, and you need to get all of them right. No partial credit.
True/False sounds simple, but the questions are specifically designed around common misconceptions. If you've been reading carefully, you'll get them right. If you've been skimming, you probably won't.
Matching gives you two columns and asks you to connect related items. Match the term to its definition, the function to its return type, the error to its cause.
Ordering gives you a list of items and asks you to arrange them in the correct sequence. This is used for process-oriented questions — what order do these lifecycle hooks fire? What's the correct sequence for setting up a trace provider?
Code Analysis shows you a real code snippet and asks questions about it. What does this function return? What happens if ctx is nil? Where's the bug? This question type tests actual engineering understanding rather than trivia recall.
After the Quiz
When you finish, you see your score and a per-question breakdown. Every question has an explanation — not just "wrong, the answer was B" but a genuine explanation of why the correct answer is correct and why the wrong ones are wrong. This is where a lot of the actual learning happens.
Your best score per chapter is tracked and feeds into the progress visualizations and readiness view.
Listening to Audio
Some chapters have podcast-style audio conversations. Click the Audio tab (microphone icon) to access it.
Two AI-generated voices — Sam and Maya — have a conversation about the chapter's content. Sam tends to ask the questions a learner would ask. Maya explains concepts clearly and builds on Sam's questions. It's scripted as a natural dialogue, not a lecture.
The conversations are generated through ElevenLabs' text-to-speech, but they don't sound robotic. The eleven_v3 model produces natural cadence, emphasis, and rhythm. Pauses between speakers are tuned — sometimes quick back-and-forth, sometimes a longer pause for effect.
Ambient Sounds
While listening, you can add a background audio layer. Four options: rain on a window, nature sounds, wind, or a quiet library. There's a dedicated volume slider for the ambient layer so you can set it to whatever level helps you focus without drowning out the conversation.
This feature exists because audio learning often happens during walks, commutes, or quiet study sessions. A bit of ambient texture makes it feel less like staring at a screen and more like settling into a focused space.
> Audio generation requires an ElevenLabs API key in the backend configuration. If someone else set up the system, the audio is pre-generated and works without any key. If you're setting it up yourself, see the README for details.
Tracking Your Progress
The Dashboard
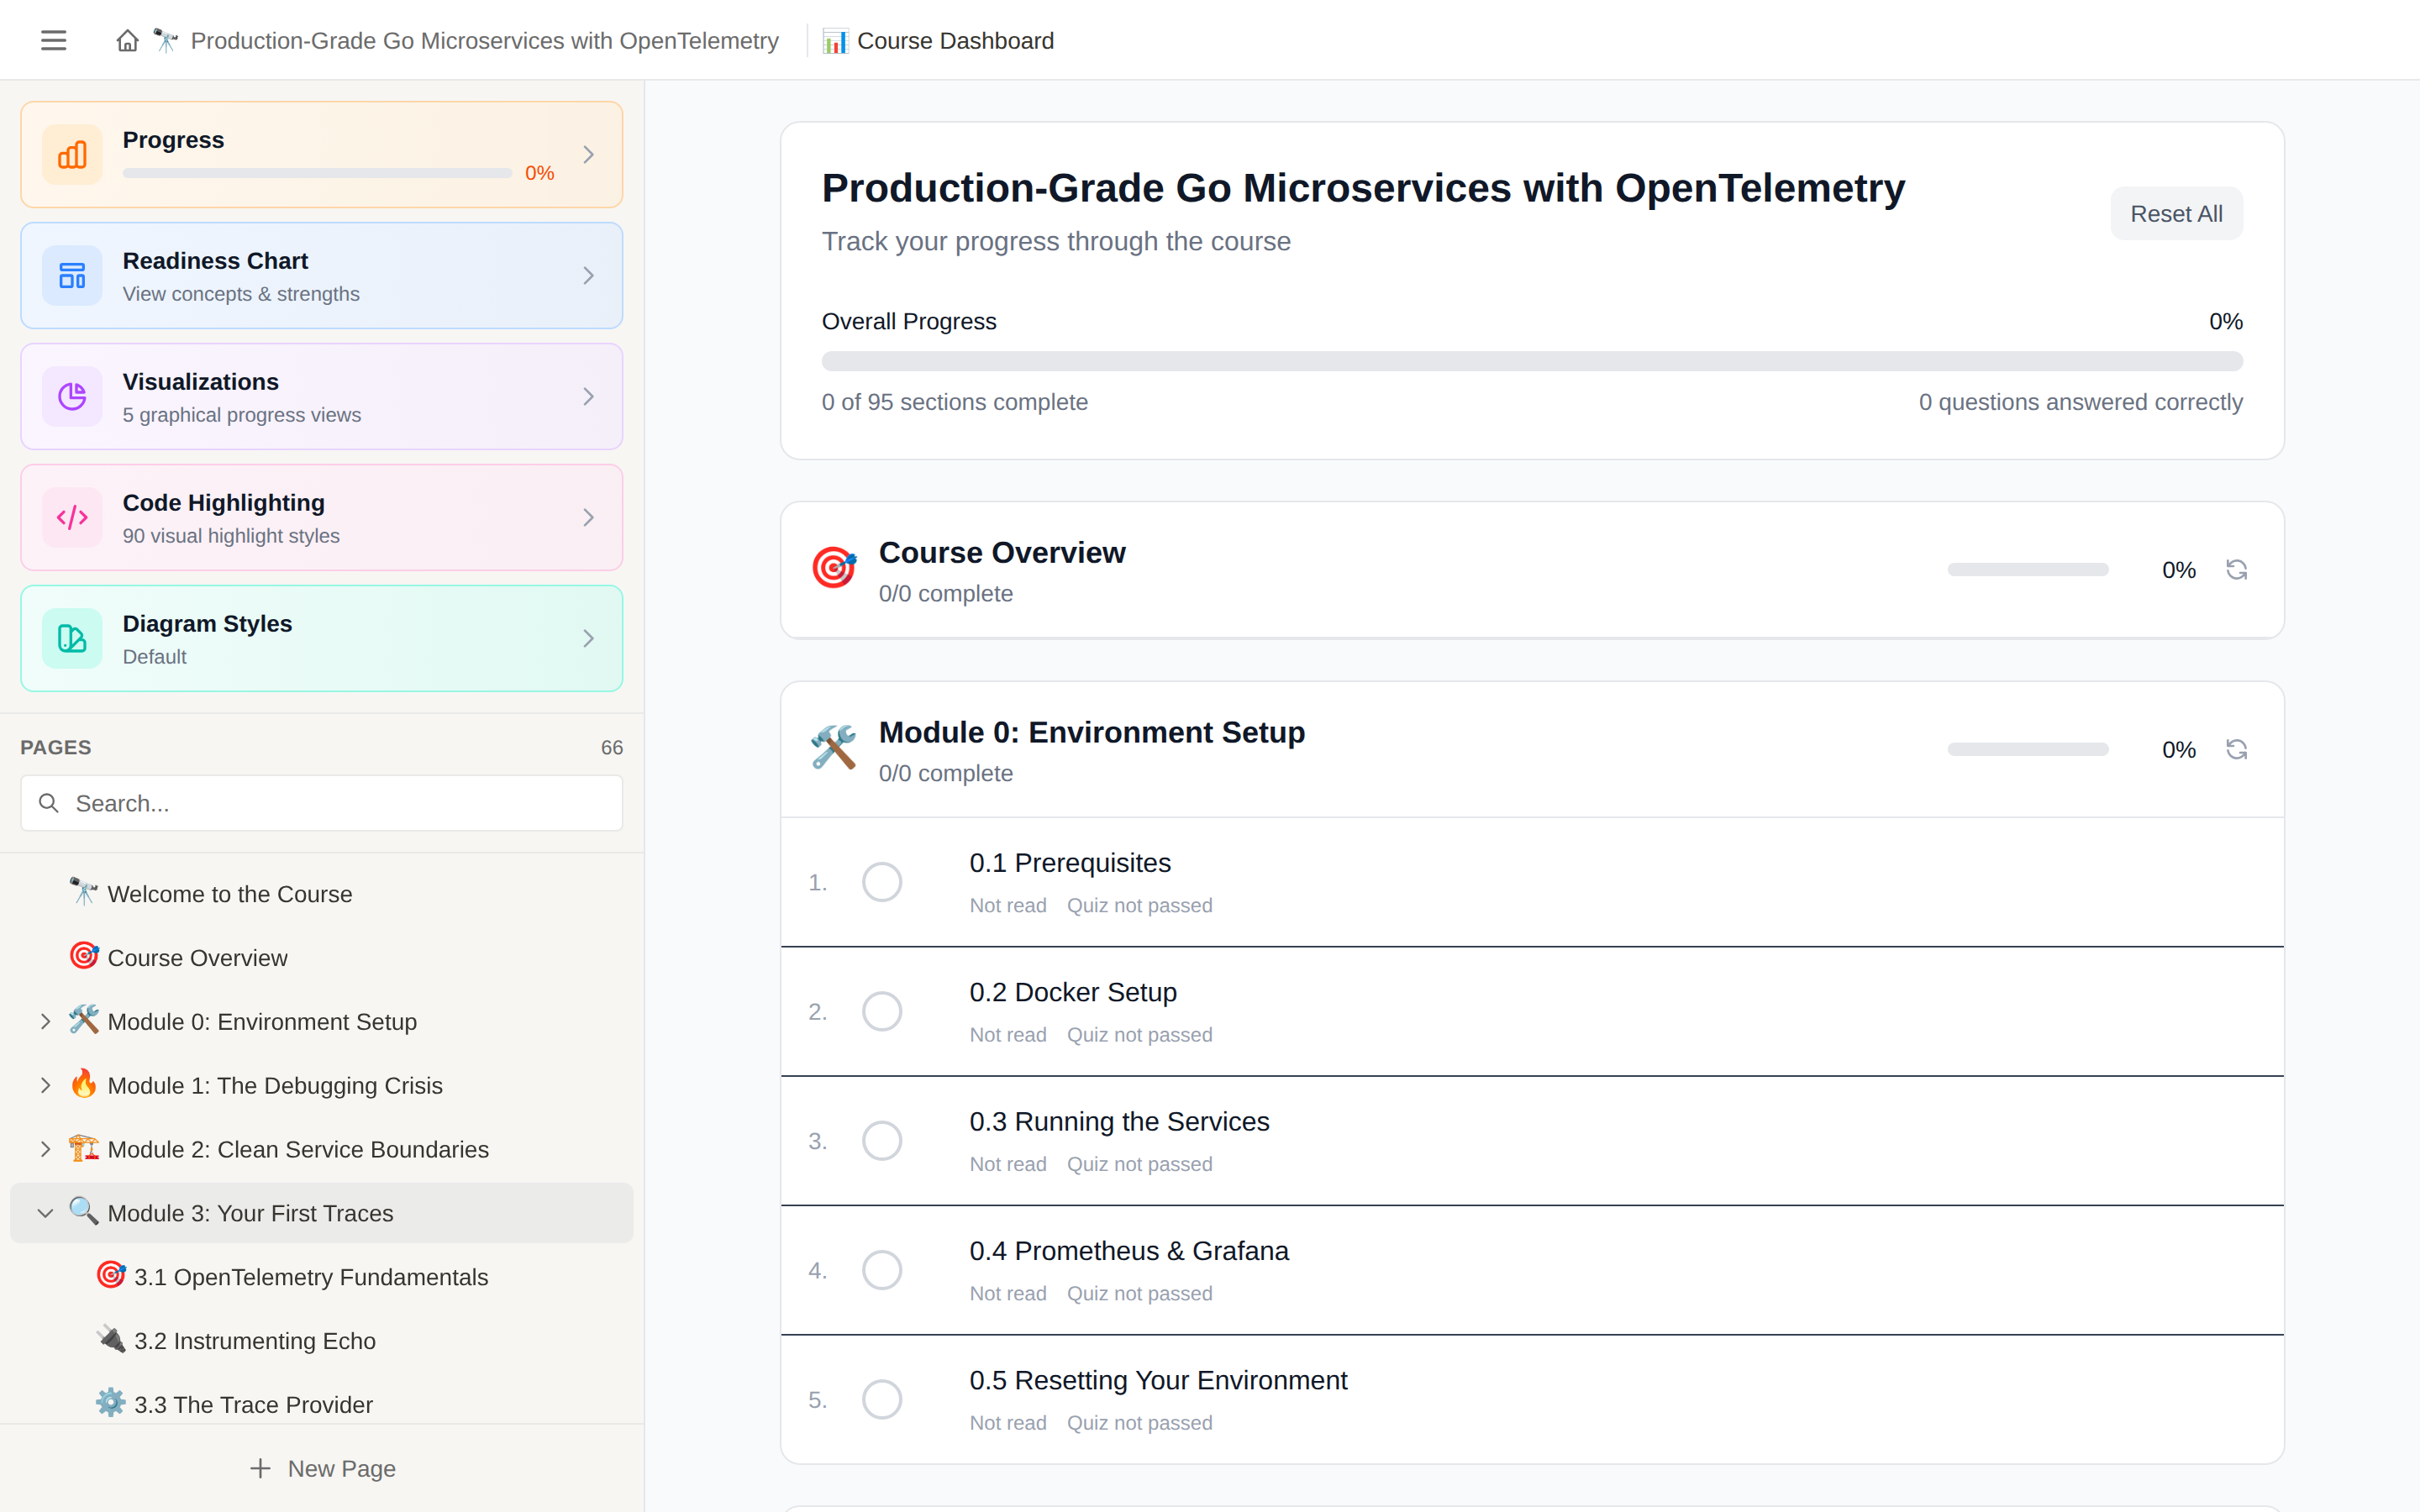
Click the Progress button in the sidebar to see the course dashboard. It shows overall completion at the top, then breaks down every module into its chapters. For each chapter you can see whether you've read it and whether you've passed the quiz.
The dashboard is your go-to for understanding where you stand. If you're working through a course methodically, check back here after each module to see how you're tracking.
The Ten Visualizations
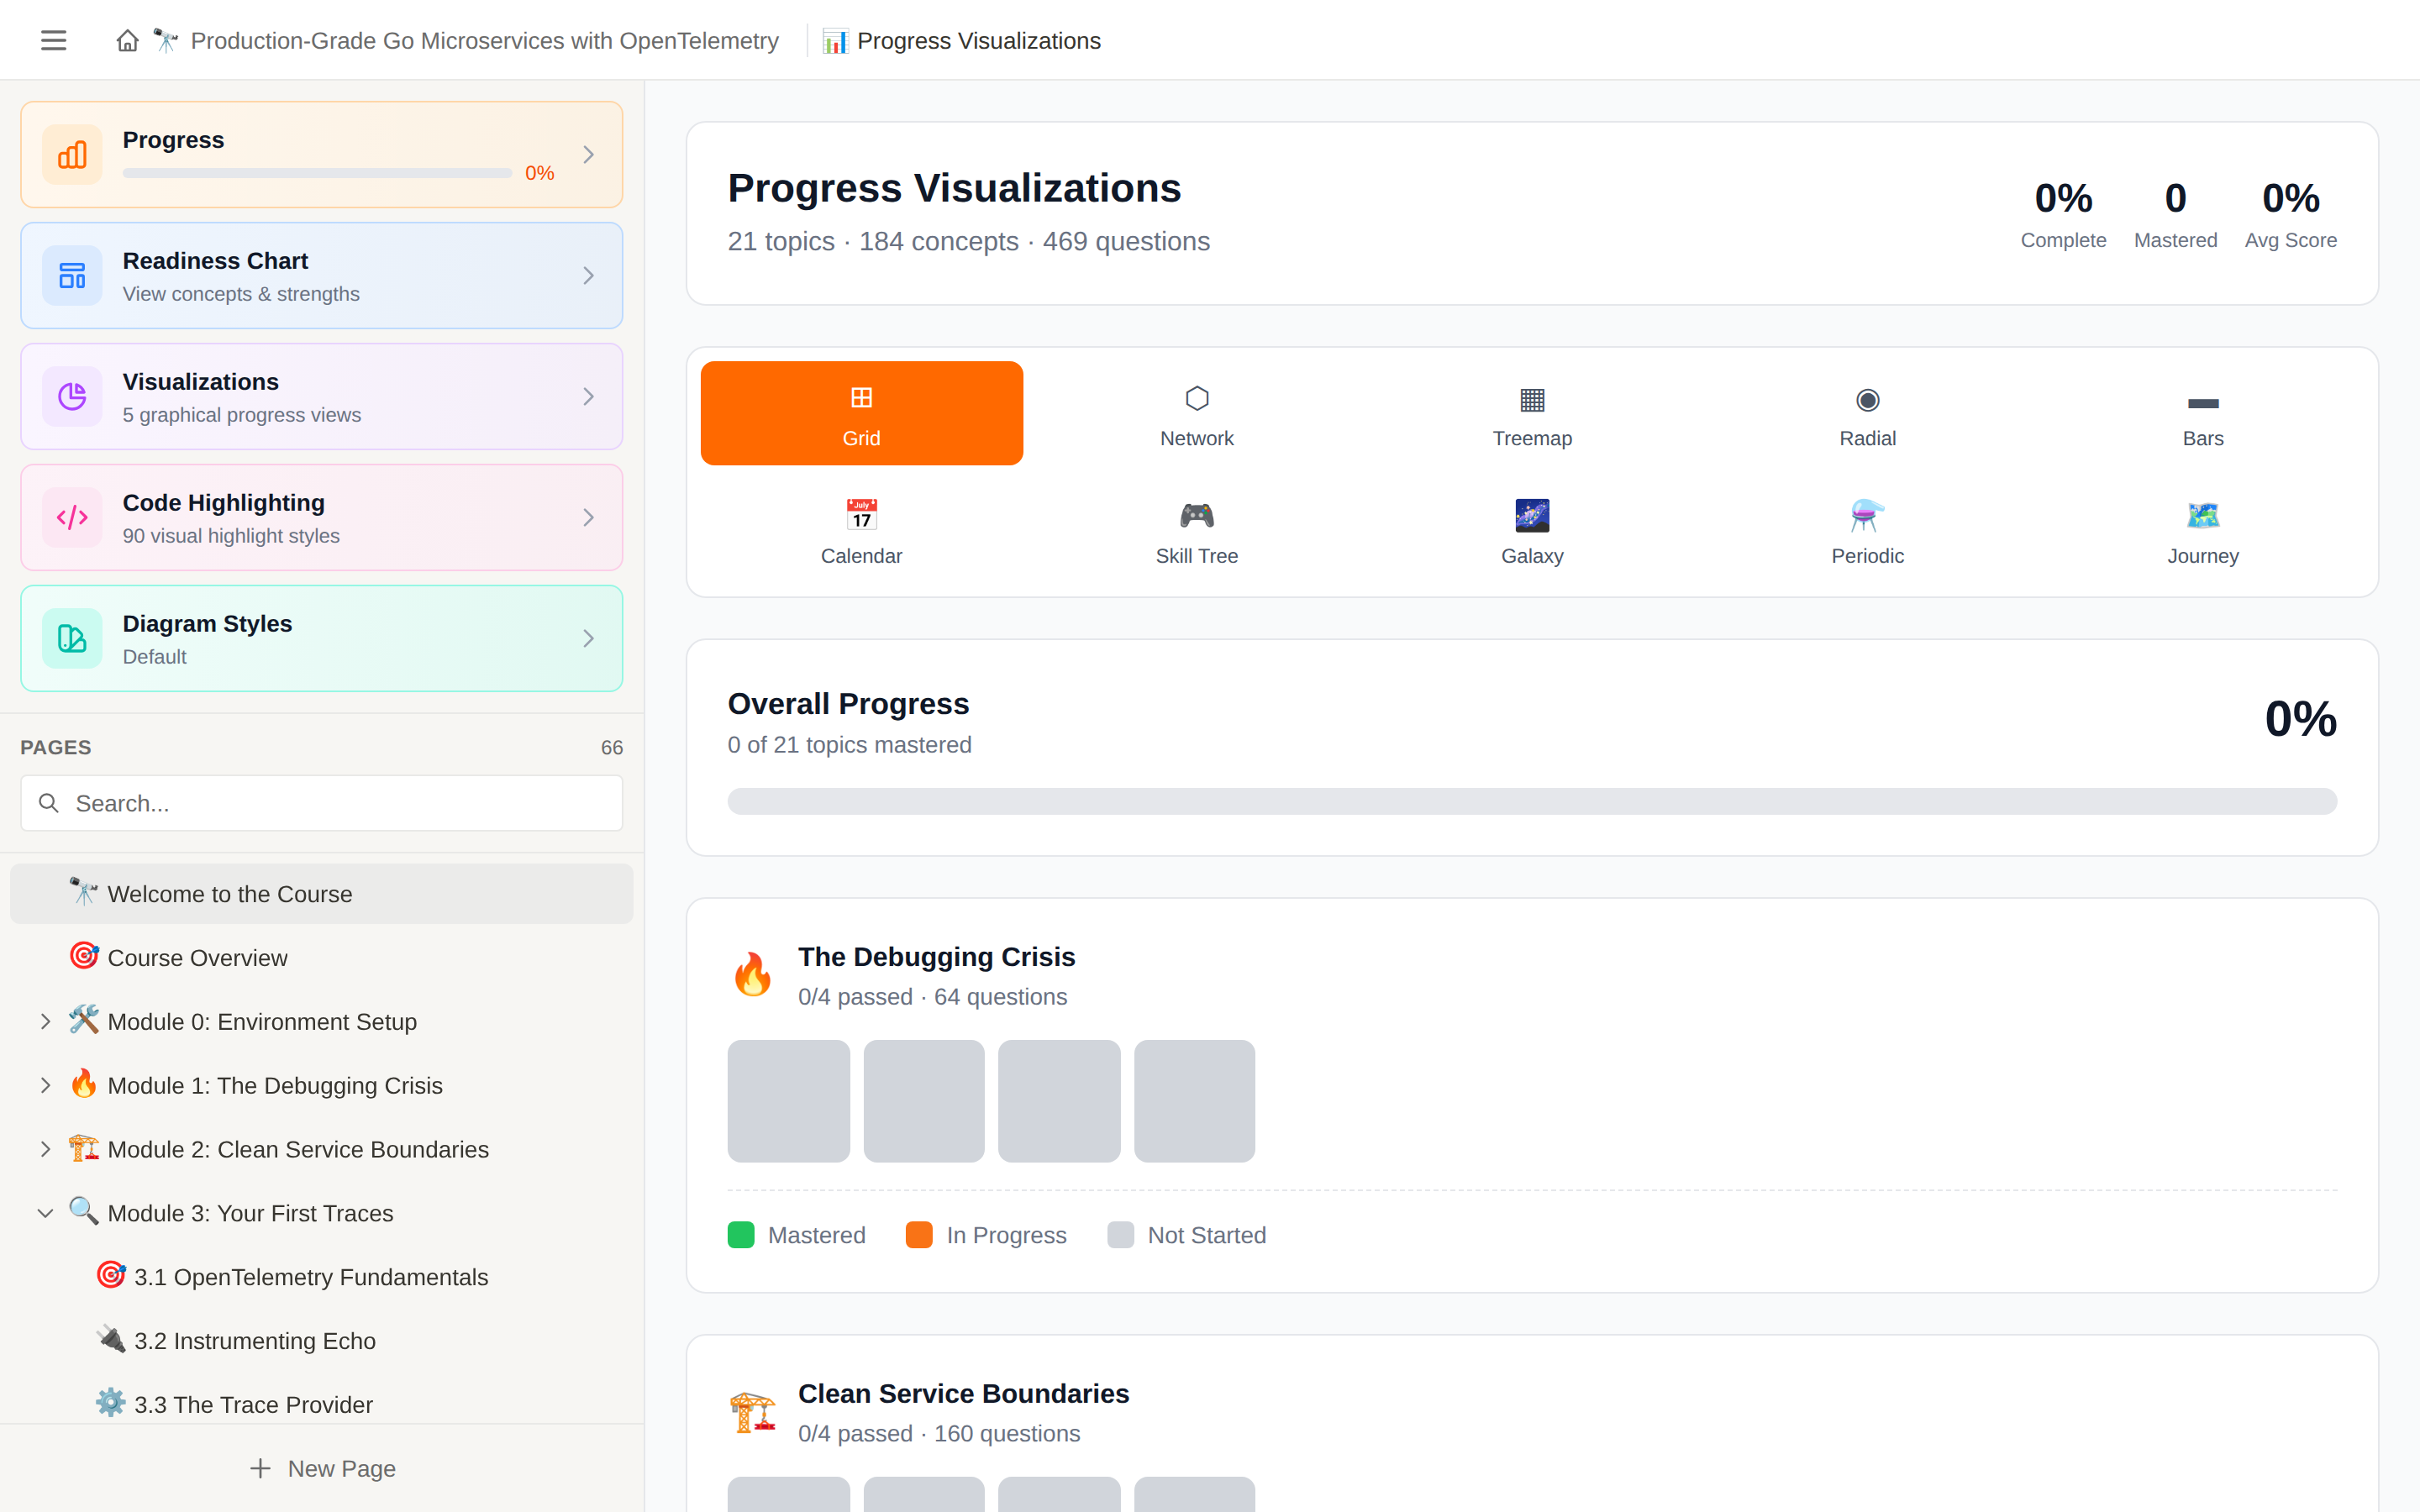
This is honestly one of the best parts of CourseCraft. Click Visualizations in the sidebar to see your progress rendered in ten completely different styles. Same data, ten perspectives. You can see the view selector at the top of the screenshot — Grid, Network, Treemap, Radial, Bars, Calendar, Skill Tree, Galaxy, Periodic, and Journey.
Grid — Simple colored boxes, one per chapter. The most minimal view, useful when you just want a quick at-a-glance snapshot. Green means mastered, orange means in progress, gray means not started.
Network — A node graph where chapters are connected dots and completed nodes are highlighted. Shows the relationship structure of the content.
Treemap — Nested rectangles where size represents chapter weight and color represents completion. Big green rectangles = mastered topics.
Radial — A sunburst chart radiating outward from the center. Inner rings are modules, outer rings are chapters.
Bars — Horizontal progress bars per chapter. Classic, clean, effective.
Calendar — A heatmap that looks exactly like GitHub's contribution graph, but tracks your learning sessions. Each day is a cell, colored by how much you studied. Streaks become visible immediately.
Skill Tree — RPG-style branching paths. Chapters are nodes that unlock as you progress through prerequisites. If you've played any game with a skill tree, you know the satisfying feeling of filling it in.
Galaxy — Your course is a galaxy. Each module is a star system. Individual chapters are stars. Completed topics glow bright, unfinished ones are dim. The whole thing has a subtle cosmic aesthetic that makes you want to light up more stars.
Periodic Table — Each concept is rendered as a chemical element in a periodic-table layout. The atomic number is the chapter order. The "weight" reflects your mastery level. Elements are color-coded by completion status. It's weirdly compelling.
Journey — Your progress as a winding road or timeline. Each stop is a chapter, and you can see how far you've come and what's ahead.
Pick whichever one resonates with you. Some people are motivated by lighting up stars. Others want to fill in boxes. Others just want a number. CourseCraft gives you all of them.
Editing Content
Flip the Edit toggle in the header and the page becomes a rich text editor.
The Editor
It's built on TipTap, the same editor engine that powers Notion. You get a formatting toolbar at the top with the standard operations — bold, italic, underline, headings, lists, blockquotes, code blocks, images, text alignment. Keyboard shortcuts work as you'd expect: Ctrl+B for bold, Ctrl+I for italic, and so on.
For code blocks, you insert one from the toolbar and select the language. Syntax highlighting appears immediately. For Mermaid diagrams, you add a mermaid block and type (or paste) the diagram code — it renders live.
Callout boxes can be inserted as info, tip, warning, or critical. Terminal blocks show simulated command-line output.
Everything auto-saves. Make a change, wait about one second, and it's written to the JSON file on disk. No save button, no "unsaved changes" warnings.
Managing Quiz Questions
In edit mode, switch to the Questions tab to build quiz questions for the current page. You pick a question type, write the question, add options (with correct answers marked), write an explanation, and link it to a concept. The quiz system automatically picks up new questions.
Page Management
The sidebar gives you tools for managing the page structure:
The + New Page button at the bottom of the sidebar creates a new page. You can also right-click any existing page to create a child page nested underneath it.
Pages can be duplicated (creates a copy with "(Copy)" appended to the title), moved between parents, or deleted. Deleting a parent deletes all its children too, so think before you click.
Use Cases
Teaching a Technical Course
This is the primary use case. You're an engineer or educator building a course about a programming language, framework, tool, or concept. You want code blocks that look good, diagrams that explain architecture, quizzes that test real understanding, and a way for learners to track their progress.
Create a course folder, write your content as JSON pages (or use the built-in editor), organize pages into modules with subdirectories, add quizzes, and optionally generate podcast audio. The included Go/OpenTelemetry course is a complete example of this — 50+ pages across 8 modules with audio, quizzes, and interactive trace diagrams.
Onboarding New Team Members
Use CourseCraft to build an internal onboarding program. Your codebase, your architecture, your processes. New engineers work through the material at their own pace, take quizzes to verify understanding, and you can see where they're struggling based on quiz results.
The file-based storage means the entire course lives in a git repo alongside the code it teaches about. When the code changes, update the course content in the same PR.
Certification Study Material
Organize certification prep material into modules with practice quizzes. The spaced-repetition effect of quizzes plus the progress tracking creates natural study accountability. The included AWS Developer Associate course structure demonstrates this pattern.
Technical Documentation That Teaches
Standard documentation tells you what. A CourseCraft course tells you why, then tests whether you understood. If your docs have a "getting started" guide that never quite gets people started, rebuild it as a course with in-page checks and quizzes.
Conference Workshop Material
Build hands-on workshop material where attendees follow along. The file tree browser lets them see the code. The trace waterfall shows distributed system behavior. Code completion exercises give them something to type rather than just read. Export the repo as a ZIP so they can take it home.
Creating a Course From Scratch
Step 1: The Course Folder
mkdir backend/pages/my-course
Step 2: The Course Definition
Create backend/pages/my-course/course.json:
{
  "id": "my-course",
  "title": "My Course Title",
  "description": "A sentence or two that appears on the course selection card",
  "emoji": "🎯",
  "color": "#6366f1",
  "createdAt": "2024-01-01T00:00:00.000Z"
}
The emoji and color appear on the course card. Pick something that represents the content.
Step 3: Your First Page
Create any .json file in the course folder:
{
  "id": "welcome",
  "title": "Welcome",
  "emoji": "👋",
  "content": "<h2>Welcome to the course</h2><p>This is your first page. Edit it in the browser or directly in this file.</p>",
  "order": 1,
  "createdAt": "2024-01-01T00:00:00.000Z",
  "updatedAt": "2024-01-01T00:00:00.000Z"
}
Step 4: Add Modules
Create subdirectories. Each directory becomes a collapsible section in the sidebar:
backend/pages/my-course/
├── course.json
├── course-intro.json
├── module-1-basics/
│   ├── what-is-it.json
│   ├── installation.json
│   └── hello-world.json
└── module-2-deep-dive/
    ├── architecture.json
    └── patterns.json
Step 5: Refresh
The backend watches the filesystem. Refresh your browser and the course appears. From here, you can either keep editing JSON files directly or use the built-in editor — whichever feels more natural.
The included course-template folder in backend/pages/ has annotated examples of every content type, visual component, and configuration option. Start there if you want to see what's possible.
Troubleshooting
The app won't load — Check the terminal where you ran ./dev-all.sh. Is the backend running? Did Vite start? The most common issue is a port conflict — Vite will pick the next available port and print it. Look for the line that says VITE ready with a URL.
Audio won't generate — You need ELEVENLABS_API_KEY in backend/.env. Without it, the audio tab simply won't appear. Everything else works fine without any API keys.
Diagrams show raw code instead of rendering — Either the Mermaid syntax has an error (check the browser console) or try switching the diagram style in the sidebar. Some complex diagrams work better with certain styles.
Changes aren't saving — Auto-save has a 1-second debounce. Wait a moment after your last keystroke. If it's still not saving, check the backend terminal for file permission errors.
The app is in a weird state — Error screens have a "Clear cache and reload" button that wipes localStorage and forces a fresh load from the server. This fixes most client-side state issues.
Port conflicts — If other dev servers are running, CourseCraft's ports may conflict. The frontend (Vite) automatically finds a free port. The backend defaults to 3002 but can be changed with PORT=3005 node backend/server.js or in backend/.env.