README
BDD Health Quest
A browser-based health and adventure game built with React and TypeScript, fully tested using Behavior-Driven Development (BDD) with Cucumber.js and Playwright.
About
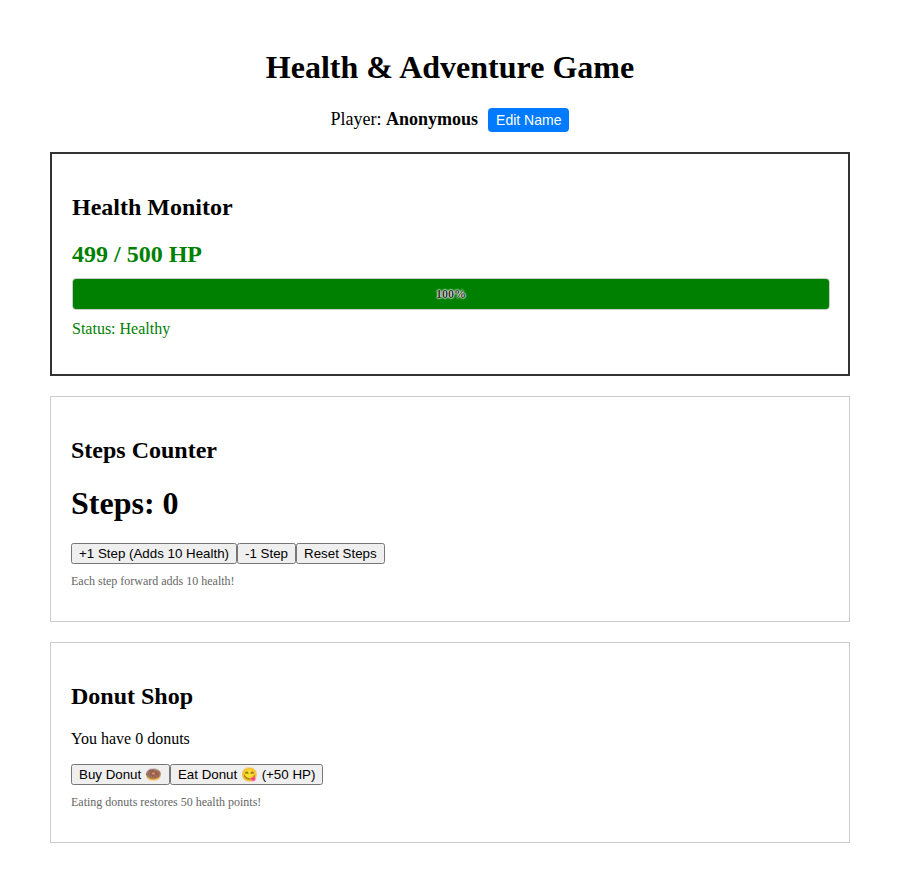
BDD Health Quest is a small interactive game where you manage a player's health by taking steps, buying and eating donuts, and customising your player name. Health decays in real time, so you need to stay active to survive.
The project serves as a practical, hands-on example of Behavior-Driven Development. Every feature was specified in plain-English Gherkin scenarios before any code was written, and all 23 scenarios run as automated browser tests that click buttons and read the screen just like a real user would.
Features
- Health Monitor -- Real-time health bar with decay, colour-coded status (Healthy/Warning/Critical/Dead), and Game Over detection
- Steps Counter -- Increment, decrement, and reset steps; each step adds 10 HP
- Donut Shop -- Buy donuts (max 5), eat them to restore 50 HP, with inventory management and error handling
- Name Editor -- Modal-based player name editing with live validation (5-7 characters)
- BDD Test Suite -- 23 Cucumber scenarios across 5 feature files, driven by Playwright
Quick Start
# Install dependencies
npm install

# Start the dev server
npm run dev

# Run the BDD tests (requires dev server on port 5174)
npm run bdd
What is BDD and Why Does This Project Use It?
If you've never encountered BDD before, here's the short version: BDD is a way of writing tests in plain English before you write any code. The idea is that anyone -- a developer, a designer, a product manager -- can read and understand what the software is supposed to do, because the tests are written as human-readable scenarios rather than low-level code assertions.
Traditional testing might look like this:
expect(counter.value).toBe(0);
counter.increment();
expect(counter.value).toBe(1);
BDD testing looks like this:
Scenario: Increment steps from 0 to 1
  Given I open the app
  Then I should see the count is 0
  When I click the increment button
  Then I should see the count is 1
Both test the same thing. But the second version reads like a user story. You can hand it to someone who's never written code and they'll understand what the app should do. That's the point.
How It Works in This Project
The BDD pipeline has three layers that connect together:
(Gherkin)
features/*.feature"] -->|"matched by
Cucumber.js"| B["Step Definitions
(TypeScript)
tests/steps/*.ts"] B -->|"drives"| C["Browser
(Playwright)
Headless Chromium"] C -->|"interacts with"| D["React App
(localhost:5174)"] style A fill:#f3e8ff,stroke:#7c3aed style B fill:#e0f2fe,stroke:#0284c7 style C fill:#fef3c7,stroke:#d97706 style D fill:#dcfce7,stroke:#16a34a
Here's a concrete example of how one line flows through the system:
Layer 1: Feature files (features/*.feature) describe what should happen using the Gherkin language. Each file covers one area of the app -- donuts, steps, health, name validation, or integration between them. These files contain no code at all.
Layer 2: Step definitions (tests/steps/*.ts) are the glue. Each Given, When, or Then line in a feature file maps to a TypeScript function that tells the browser what to do. For example, "When I click buy donut" maps to a function that calls page.click('[aria-label="buy donut"]').
Layer 3: The browser (Playwright) is the actual execution layer. Cucumber.js reads the feature files, matches each line to a step definition, and the step definition drives a real headless Chromium browser that loads the app, clicks buttons, fills in forms, and reads text off the page.
When you run npm run bdd, all three layers come together: Cucumber reads the plain English, calls the matching TypeScript functions, and Playwright drives the browser. If the app behaves as the feature file describes, the test passes.
Architecture Deep Dive
The game itself is a React app with a clean separation of concerns. Here's how the pieces fit together and why each one exists.
The State Layer: GameContext
Everything in the game flows through a single React Context called GameContext. It holds five pieces of state:
health(number) -- your current HP, starts at 500maxHealth(number) -- the highest your health has ever beensteps(number) -- your step countdonuts(number) -- how many donuts you're carryingplayerName(string) -- your display name
incrementSteps, buyDonut, consumeDonut, addHealth, and so on. Every component in the app reads from and writes to this same shared context, which means there's one source of truth for the entire game state.
This pattern is important for testing. Because all state is centralised, when a test clicks the "Buy Donut" button and then checks the donut count, there's no ambiguity about where that count comes from.
The Component Layer
The UI is split into small, focused components, all connected through the shared GameContext:
wraps everything in context"] GC["GameContent"] HM["HealthMonitor
reads: health, maxHealth"] ST["Steps
reads: steps
calls: increment, decrement, reset"] DN["Donuts
reads: donuts
calls: buyDonut, consumeDonut"] NE["NameEditor
reads: playerName
calls: setPlayerName"] CTX["GameContext
(shared state)"] App --> GP --> GC GC --> HM GC --> ST GC --> DN GC --> NE HM -.->|useGame| CTX ST -.->|useGame| CTX DN -.->|useGame| CTX NE -.->|useGame| CTX style CTX fill:#fef3c7,stroke:#d97706 style HM fill:#dcfce7,stroke:#16a34a style ST fill:#e0f2fe,stroke:#0284c7 style DN fill:#f3e8ff,stroke:#7c3aed style NE fill:#fee2e2,stroke:#dc2626
Each game component calls the useGame() hook to get exactly the state and actions it needs. HealthMonitor only reads health and maxHealth. Steps reads steps and uses incrementSteps, decrementSteps, and resetSteps. They don't know about each other.
But they're connected through the context. When Steps calls incrementSteps(), that function also adds 10 HP to health. HealthMonitor automatically re-renders because health changed. The components are independent but the state ties them together.
The Real-Time Mechanic: Health Decay
A custom hook called useHealthDecay runs a timer that ticks every second, reducing health by 1 HP. This is what gives the game its urgency -- if you just sit there, your health slowly drains to zero and you get a Game Over.
(every 1 second)"] -->|"-1 HP"| Health["health state"] Health -->|"> 300"| Healthy["🟢 Healthy"] Health -->|"151-300"| Warning["🟠 Warning"] Health -->|"1-150"| Critical["🔴 Critical"] Health -->|"= 0"| Dead["💀 Game Over"] style Healthy fill:#dcfce7,stroke:#16a34a style Warning fill:#fef3c7,stroke:#d97706 style Critical fill:#fee2e2,stroke:#dc2626 style Dead fill:#fca5a5,stroke:#991b1b
The decay is implemented as a setInterval inside a useEffect. It reads the decay rate and interval from gameConfig.ts, so the timing is configurable in one place rather than scattered through the code.
The Configuration Layer
All magic numbers live in constants/gameConfig.ts:
| Setting | Value | Purpose |
|---|---|---|
INITIAL_HEALTH | 500 | Starting HP |
HEALTH_DECAY_RATE | 1 | HP lost per tick |
DONUT_HEALTH | 50 | HP restored per donut |
STEP_HEALTH | 10 | HP gained per step |
MAX_DONUTS | 5 | Inventory limit |
NAME_MIN_LENGTH | 5 | Shortest valid name |
NAME_MAX_LENGTH | 7 | Longest valid name |
MAX_DONUTS from 5 to 10, both the app logic and the feature files should reflect that.The Validation Layer
All validation logic lives in utils/validation.ts, separate from the UI components. This includes:
- Name validation -- checks length against the config thresholds and returns a structured result with
isValidanderrorfields - Health status -- maps HP to a status string (Healthy, Warning, Critical, Dead)
- Health colour -- maps HP to a display colour (green, orange, red)
- Health percentage -- calculates bar width as a percentage of max health
How the BDD Tests Map to the Architecture
Each feature file targets a specific area of the game. The integration feature file is special -- it tests the connections between components:
3 scenarios"] DF["donuts.feature
7 scenarios"] HF["health-monitor.feature
5 scenarios"] NF["name-validation.feature
5 scenarios"] IF["integration.feature
3 scenarios"] end subgraph "App Components" ST2["Steps"] DN2["Donuts"] HM2["HealthMonitor"] NE2["NameEditor"] end CF -->|tests| ST2 DF -->|tests| DN2 HF -->|tests| HM2 NF -->|tests| NE2 IF -->|tests| ST2 IF -->|tests| DN2 IF -->|tests| HM2 style IF fill:#fef3c7,stroke:#d97706 style CF fill:#e0f2fe,stroke:#0284c7 style DF fill:#f3e8ff,stroke:#7c3aed style HF fill:#dcfce7,stroke:#16a34a style NF fill:#fee2e2,stroke:#dc2626
| Feature File | What It Exercises |
|---|---|
counter.feature | Steps state + increment/decrement/reset actions |
donuts.feature | Donut state + buy/eat actions + inventory limits |
health-monitor.feature | Health display + decay + max health + game over |
name-validation.feature | Name editor modal + validation rules + save/cancel |
integration.feature | Cross-component effects (steps affect health, etc.) |
Tech Stack
| Layer | Technology |
|---|---|
| Frontend | React 18, TypeScript |
| Build | Vite |
| Testing | Cucumber.js, Playwright |
| Linting | ESLint |
Project Structure
src/
  App.tsx                          # Root component
  components/
    game/
      HealthMonitor.tsx            # Health bar and status display
      Steps.tsx                    # Step counter controls
      Donuts.tsx                   # Donut shop with buy/eat
    modals/
      NameEditor.tsx               # Player name editing modal
    ui/
      Modal.tsx                    # Reusable modal component
      Button.tsx                   # Reusable button component
  context/
    GameContext.tsx                 # Central game state provider
  hooks/
    useGame.ts                     # Game context consumer hook
    useHealthDecay.ts              # Real-time health decay hook
  constants/
    gameConfig.ts                  # All game configuration values
  types/
    game.types.ts                  # TypeScript type definitions
  utils/
    validation.ts                  # Name validation, health utilities

features/                          # Gherkin feature files
  counter.feature
  donuts.feature
  health-monitor.feature
  integration.feature
  name-validation.feature

tests/
  steps/                           # Cucumber step definitions
  support/                         # Test hooks and world setup
BDD Test Coverage
| Feature | Scenarios | What's tested |
|---|---|---|
| Steps Counter | 3 | Increment, decrement, reset |
| Donut Shop | 7 | Buy, eat, limits, errors, inventory management |
| Health Monitor | 5 | Initial values, decay, max health, game over |
| Name Validation | 5 | Default name, modal, too short/long, valid save |
| Integration | 3 | Steps + health, donuts + health, combined actions |
User Guide
For detailed instructions on gameplay, controls, and strategy, see the User Guide.
License
MIT